KPIs for Software Engineers

Key Performance Indicators are a common business practice. They are a quantifiable measure of performance for a specific objective. Occasionally, I am asked to create my own KPIs as an individual contributor. I think it is a bit strange, after all I work for the company, you’d think they would tell me what the KPIs are!

Ideally we want to avoid metrics which are created arbitrarily by team members. Hours worked is a great example of this especially in remote work environments. In hourly workplaces employees check in and check out to validate hours worked. I have never seen a software company do anything comparable. Typically, the software company employee is asked to fill in timesheets based on their personal memory with zero accountability. That scenario does not make for a good KPI. 

For our KPI metrics we have the following criteria:

  • countable 
  • verifiable by external system
  • valuable 
  • Individually attributable 

Countable 

KPIs need to be quantifiable. It should be easy to number how many of X someone completed

Verifiable

There should be impartial systems tracking KPI completion. We want to use systems like PagerDuty, JIRA, Github, etc to source our KPI data. 

Valuable

KPIs should relate to valuable activities for the company. We want our staff focused on things that are important. 

Individually attributable

KPIs should be based on individually attributable work. We want to avoid subjective judgements of how much of task X engineer 1 did vs engineer 2. We also do not want to encourage infighting over who gets credit for which tasks. 

Here are a few measurable things we could use for KPIs. 

  • lines of code 
  • commits 
  • bugs fixed
  • tests written 
  • Pull requests opened | accepted / rejected
  • Pull request comments
  • Pull requests reviewed | approved / rejected
  • story tickets completed
  • stories estimated 
  • Projects lead 
  • Projects delivered / Epics delivered 
  • architecture documents published
  • architecture documents reviewed / comments / approved / rejected
  • Documentation pages published
  • oncall response time when paged
  • pages recieved daytime/off hours
  • Prod deployments 
  • meetings attended
  • Pair programming sessions attended
  • Junior dev questions answered (answers documented in wiki / private stack overflow)

KPIs are a useful concept for businesses to track their performance. But they are often really ideal for business groups to examine their performance. Individual contributors rarely can claim responsibility for things like increasing the subscription renewal rate from 1% to 10%.

While this list is not exclusive it should include most of the trackable numerical things that software engineers do in their job. Then if you need to come up with some KPIs for yourself you can just pick from this list.

If you can think of some more good metrics for software engineers let us know!

Code Review Handbook

Previously published as a PDF

Code Review Handbook: Code Review Basics

How do you do a code review? Typically, I get an email from bitbucket or Github saying “Adam added you as a reviewer on ‘SMB-1182-larger-buttons’”.  This is probably the 10th PR of the day, it is a constant stream. Often there is a 20 file PR that I just do not want to get started on. This is the industry standard PR environment, where the requests are constant and each PR blocks the writer until he gets the magical number of review checkmarks that let him move that JIRA ticket to ‘Ready for QA’. 

The modern Pull Request workflow is what inspired me to write this handbook. This chapter will go over the basics of doing a code review. What the common expectations are, and what you should do to help your team move forward. 

The basic workflow for a Pull Request (PR) is that a member of the development team has completed a feature in a branch and now has to get ‘approvals’ from other team members before it can be merged into the release branch. These days it is common to require any code that gets used first go through an approval process. As a team member you are expected to review pull requests in a timely manner. Typically, you can put off PRs until the end of the day and hope that they get merged before you do anything. But its unlikely that you will escape reviewing entirely. Some teams require every team member to approve every pull request others require only one or two approvals before the branch can be merged. 

When you get down to reviewing code, the basic expectation is that you will read all of the proposed changes and comment about any bad practices or troublesome logic that could cause problems down the line. The dream is that you will catch a mistake or a security vulnerability that otherwise would have cost the company millions of dollars had it gone into production. The reality is that most of your comments will be reminding people to follow the style guide or to not organize their code like monkeys with type writers. In my opinion pull requests are rarely read carefully enough to catch bugs or vulnerabilities. 

The issue is that doing pull reviews throughly requires a substantial amount of time. A twenty file pull request, the like of which you might get two or three a day, could eat up thirty minutes by itself. Most developers have a lot of features to add and bugs to write, time spent reviewing other people’s work does not add a lot to your bottom line. 

Preparing to do Code Reviews

I get a lot of PRs to review every day and what can happen is you get in to work and there are 2 PRs waiting for you. You just sat down at your desk and there is already 20 pages of diffs for you to review. Then you get to the status update meeting, team members with outstanding PRs ask people to review them. Then your boss sends you an email with architecture questions, or more likely someone else relays your boss’s architecture questions to you via slack. You quickly hash something out to answer your bosses questions, then try to squeeze in a few minutes on your actual ‘work’ deliverables. An hour later its time to grab lunch before the rush starts, and head back to the office for the pre-backlog grooming meeting. During the meeting you get several urgent slack messages about the website being down and you spend the next couple hours fixing the issue. Now its 5pm and the 2 outstanding PRs you had at the beginning of the day have grown into 5 PRs. Your chats are full of teammates’ request for you to review their code already. 

Everyone has had a similar experience, where the list of PRs you need to review keeps growing and it does not seem like there is anyway to handle it. 

Block off time

The best way to handle Pull Request reviews is to block off time everyday to address them. I recommend a 30-60 minute block first thing in the morning. I usually have a 45 minute block before our daily standup which I use to review PRs and catch up on my email. Depending on how many PRs you need to review, consider scheduling another block of time at the end of the day. It could be 4:30-5pm or 6-6:30pm, depending on your schedule. The goal is to ensure that you are not stopping other people’s work by getting to PR reviews in a timely manner. 

Decide how much time is enough

If you have blocked off 30-60 minutes everyday and it still is not enough, I recommend cutting off PR reviews after you spend a certain amount of time on them. If you schedule one hour a day, stop reviewing PRs after that hour and do not review anymore until the next day. You will want to discuss this with your manager and team so that they know how much time it is taking to review all of the code. Your team may need to have a general discussion about how many reviews are needed for each pull request. You might have to change from the entire team reviewing every PR to only requiring two approvals for each pull request. Try to think about the Pull Request Review process as a tool that we use to avoid bugs and improve product quality. We do not ‘have’ to do Pull Request Reviews to have a quality product or avoid bugs, we want to use the tool to help us. So if your team is spending too much time reviewing Pull Requests it may be the right decision to cut back. 

Decide how Thorough Reviews should be

In addition or alternative to setting a maximum time spent on reviews, you can choose to do less through code reviews to save time. I would recommend having less people review each PR before you cut back on thoroughness of the reviews, because people tend to skip through reviews when they see that a few people have already approved the PR. Its better to have two people spend 15 minutes each then to have 5 people spend 3 minutes skimming the pull request. 

Setup your Code Review Environment

Once you have sorted out how much time you need, its time to setup your environment. To do code reviews you want to set up a split-diff view of the code. This can be done in several ways, Github, Bitbucket and most other central git repositories include a split-diff setting for Pull Request reviews, but it is not always the default setting. Find the documentation for your Pull Request tool and figure out how to change it to split-diffs by default. Its definitely worth trying for PRs with a lot of diffs in each file. 

There are a couple offline tools that can give you split-diffs if your central git store does not include that feature or if you are not using one of the common SAAS git services. Git includes a git-difftool by default which provides several different tools to help you view diffs, https://git-scm.com/docs/git-difftool

I also recommend getting a large screen to review pull requests in. A 13in laptop is going to make it harder for you to see changes and require more scrolling. Get a bigger screen if you can. 

Do the review in one go

I recommend doing code reviews in one go. It is a common temptation to squeeze PR review into short blocks of time, but then you will not be able to get through long PRs in one go. The last thing you want to do is skim through a long PR three times without understanding anything in it. Make sure you have at least enough time to read all of the changes and comment a bit before your next obligation. 

Three levels of Code Review

Not every code review needs the same level of thoroughness, sometimes just a quick check for obvious errors works. Other times you may need to throughly examine a major change and ask for multiple revisions. In this section we will describe three different PR review strategies you can use depending on the situation. 

The Quick Skim 

  • read the code
  • check for tests
  • ask questions
  • suggest improvements
  • get out

The Quick Skim is the fastest version of the PR review. You can use it when you are reviewing code that has already been reviewed several times or when the PR is small and unlikely to cause problems in your judgement. This is also a good option if you want to save time. 

The first step is to read the code, you want to read through each file of changes. Resist the urge to read as quickly as you can. You can read through most PRs in less than 5 minutes without rushing. If the PR is really too long to read in 5 minutes, its ok to take more time, but that should trigger a conversation with the team. Large Pull Requests are harder to understand and harder to integrate into the rest of the codebase. Sometimes you need to make sweeping changes, but you should not be seeing PRs like that everyday.

Next, check for updates to the testing suite. Most PRs should include new tests, or updates to the existing tests. If the PR is a bug fix, ask if they have a test to check if the bug is reintroduced. Its rare to see a PR that does not need any test changes at all. 

Ask questions about the changes. It could be formatting, reimplementing a method instead of using a library or just something that you don’t understand in the change. Finally, suggest at most a few of the improvements that you thought of and move on. You want to suggest only the most important changes that occurred to you. Do not give a list of twenty things you want changed in the PR comments. Pick the top three changes that will have the biggest impact on improving the code. The goal for the Quick Skim is to save you as much time as possible, and arguing or even talking about low impact changes to a PR is not going to save that time. Finally, approve the PR and stop thinking about it. Ideally you noticed some issues, pointed them out and they were addressed promptly. Average case, you pointed out some issues, one of them was addressed and you got back to work on your tasks with minimal interruption. 

The thorough review

  • read the code 
  • ask questions
  • suggest improvements
  • review tests carefully
  • consider implications
  • suggest missing test cases

The Thorough Review is targeted for subject matter experts reviewing changes to code that they know well. If you are the ORM guy reviewing a PR that makes changes to the ORM system, the team is probably relying on you to find any problems at the PR phase. Once you approve the PR other people are likely to just hit ‘approve’ and move on, so its important for you to catch the issues. 

The flow for the Thorough Review starts off just like the Quick Review, but our mindset is different. We are focusing on finding issues in the code instead of saving time. Start off by reading the code and asking questions about the rationale behind the changes. Suggest improvements or alternative approaches if you think of any. You do not necessarily have to force a change, but its useful to have people consider alternatives. 

Now, review the tests carefully. Do the test changes match the code changes? Are there any missing test cases that could have been added? 

The exhaustive/critical review

  • read the code 
  • download the code
  • run unit tests
  • boot up the application and manual test
  • ask questions, point out missing functionality 

The Exhaustive review, so named because you will be exhausted if you have to do a lot of these. The main difference between this one and the previous is that we are downloading the code and testing it locally. Checkout the branch and run the test suite, does it pass? Boot up a development server and do some manual testing, does feature x actually work with these code changes? Did the size of that button actually change? The idea behind the manual testing is to poke around and find anything that was not caught by the test suite. 

Three Levels Summary 

Quick 

  • read the code
  • check for tests
  • ask questions

Thorough

  • read the code
  • check for tests
  • ask questions
  • read tests thoroughly — check cases carefully 

Exhaustive

  • read the code
  • check for tests
  • ask questions
  • read tests thoroughly — check cases carefully
  • Run the code locally, test manually and via test suite

Querying complex JSON objects in AWS Athena

AWS Athena is a managed big data query system based on S3 and Presto. It supports a bunch of big data formats like JSON, CSV, Parquet, ION, etc. Schemas are applied at query time via AWS Glue. 

To get started with Athena you define your Glue table in the Athena UI and start writing SQL queries. For my project I’ve been working on heavily nested JSON. The schema for this data is very involved so I opted to just use JSON path and skip defining my schema in AWS Glue. Of course that was after I wasted two days trying to figure out how to do it. 

Setting up AWS Athena JSON tables

AWS Athena requires that your JSON objects be single line. That means you can’t have pretty printed JSON in your S3 bucket. 

{
    "key" : "value",
    "hats" : ["sombrero", "bowler", "panama"]
} 

If your JSON files look like the example above they won’t work. You have to remove line breaks so your json objects take up a single line.

{"key":"value","hats":["sombrero","bowler","panama"]}

One tripping point is that its not obvious in the docs how to define your table if you aren’t going to use Glue schemas.  

My dataset consists of S3 objects that look like this. 

{
    "data":
    {
        "component1":
        {
            "date": "2020-02-24",
            "qualifier": "Turnips",
            "objects":
            [
                {
                    "type": " bike",
                    "date": "2022-01-14",
                    "xy" : {
                        "xy-01": 1432
                    }
                },
                {
                    "type": "pen",
                    "date": "2021-07-11",
                    "xy" : {
                        "xy-01": 11
                    }
                },
                {
                    "type": "pencil",
                    "date": "2021-07-11",
                    "xy" : {
                        "xy-01": 67
                    }
                }
            ]
        },
        "component2":
        {
            "date": "2021 - 03 - 15",
            "qualifier": "Arnold",
            "objects":
            [
                {
                    "type": "mineral",
                    "date": "2010-01-30",
                    "xy" : {
                        "xy-01": 182
                    }
                }
            ]
        },
        "component3":
        {
            "date": "2020-02-24",
            "qualifier": "Camera",
            "objects":
            [
                {
                    "type": "machine",
                    "date": "2022-09-14",
                    "xy" : {
                        "xy-01": 13
                    }
                },
                {
                    "type": "animal",
                    "date": "2021-07-11",
                    "xy" : {
                        "xy-01": 87
                    }
                }
            ]
        }
    }
}

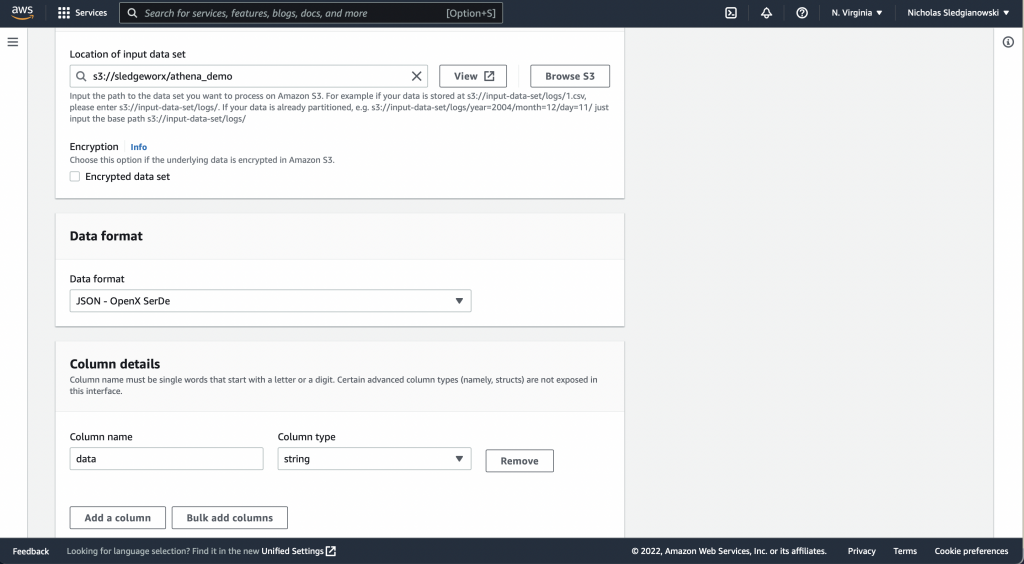
To use Athena and JSON Path for a nested JSON object like this. You simply define a single column called “data” with a string type and you are done. 

Setting up an Athena table for complex JSON object queries.

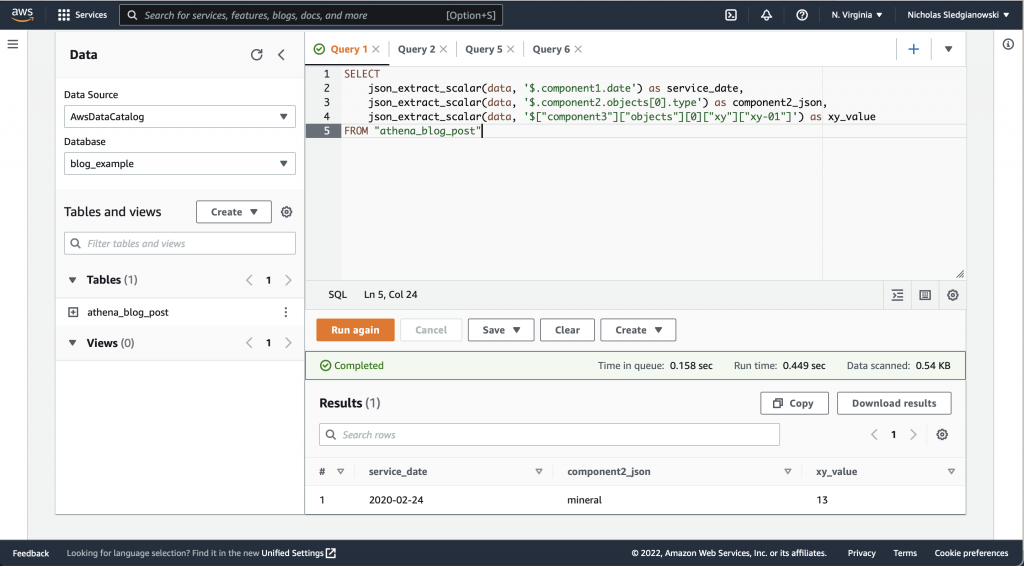
Then you query using JSON Path like this. 

Example of a simple JSON PATH Athena query

SELECT 
    json_extract_scalar(data, '$.component1.date') as service_date, 
    json_extract_scalar(data, '$.component2.objects[0].type') as component2_json,
    json_extract_scalar(data, '$["component3"]["objects"][0]["xy"]["xy-01"]') as xy_value
FROM "athena_blog_post"

Note that the json_extract and json_extract_scalar functions take a string column as their argument.

One thing to watch out for is that the dash character “-” is banned from the first type of JSON Path. So you might have to use the bracket notation instead.

Using the UNNEST operator to pivot and flatten JSON arrays of objects.

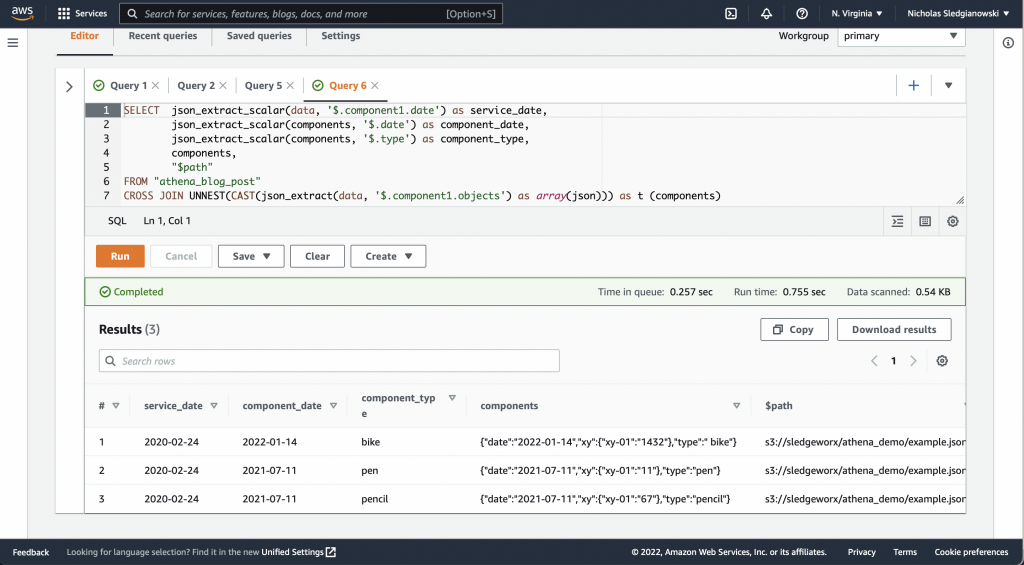
Often when working with JSON data you will have arrays of objects. You might want to split each entry in a nested array into its own row. This can be accomplished with the UNNEST operator.

Using the UNNEST operator to pull data from nested arrays into rows.

Here we have used json_extract to retrieve a nested JSON object. Then we cast it into a json array which the UNNEST operator accepts.

SELECT  json_extract_scalar(data, '$.component1.date') as service_date, 
		json_extract_scalar(components, '$.date') as component_date,
		json_extract_scalar(components, '$.type') as component_type,
		components,
		"$path"
FROM "athena_blog_post"
CROSS JOIN UNNEST(CAST(json_extract(data, '$.component1.objects') as array(json))) as t (components)

Doorkeeper with Rails and Zapier

I set up Oauth2 authentication with Zapier for Seviipay.com recently and figured it was worth a short post on the gotchas I encountered.

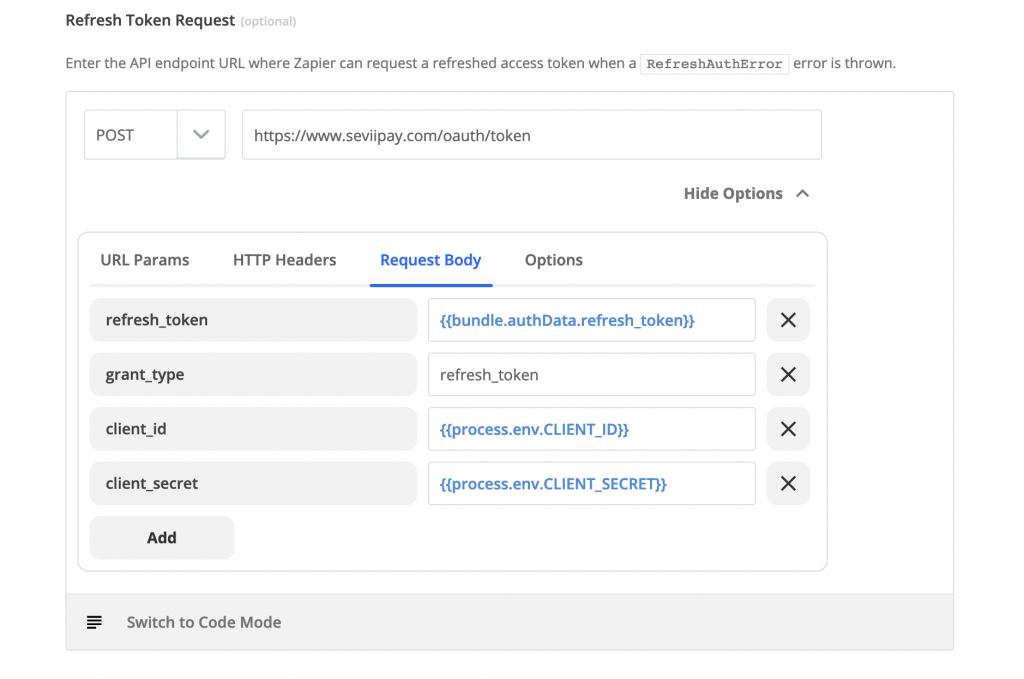
The biggest problem I had was with the Refresh token configuration. I would do a test connection, validate that I wanted to give Zapier access, send a test notification and it would work. Then an hour later I get an email from Zapier that they got a 401 error and are turning off my integration. The issues were that Doorkeeper does not enable refresh tokens by default and that Zapier does not pass the client ID or secret by default to the refresh api.

Below is my doorkeeper.rb with all comments removed. I had to uncomment the line for use_refresh_token.


Doorkeeper.configure do
  orm :active_record

  resource_owner_authenticator do
       current_user || warden.authenticate!(scope: :user)
  end

  admin_authenticator do |_routes|
    current_user || warden.authenticate!(scope: :user)
  end

  access_token_expires_in 2.hours
  use_refresh_token
end


Then in Zapier I just had to update my request options to include the client id and client secret.

One other issue I ran into is that Doorkeeper requires you to set a SCOPE. I just put the string ‘READ’ in for my scope and it seems to be working.

How to make oncall great on your team.

Being on-call for software can suck. It seems like everyone has a horror story of being woken up at 3am for an outage in their service, and then having to work until daylight to get things working again. I have been on an on-call rotation for about two years now and it has gone very well. We typically get paged during off hours once per week and resolving a page usually takes under three hours. Here are some thoughts on what makes an on-call experience great. 

Page Frequency 

The biggest thing in my opinion is that the page frequency is on the lower end at 1-2 off hours pages per week. Off hours just means outside of the typical business hours of 9-5. A wake up would be getting paged when you were asleep in the evening. Having a low rate of pages is important because it means your on-call can get adequate rest during the week. In the worst case scenario where your on-call gets woken up twice during a week long on-call shift, they will still be operating reasonably well by week end. Page frequency is especially important if you on-call rotation is smaller. 

Rotation size

Oncall rotation size is important. You need people to spread the load around. I’ve worked in rotations ranging from 3-11 people and 5-10 is the sweet spot. At that size you have about a month off between on-call shifts. Beyond 10 people and you will start to get rusty since people are only on-call about every 2 months. Having more people also makes it easier to support vacations without anyone feeling like they didn’t get a break from being on-call. Smaller rotations are bad because the engineers on the team will not get enough time between shifts to complete project work. Feature development will stall and your team basically becomes an ops team. Additionally, the bus factor is too low in a small rotation, if one person goes on vacation and the other has a power outage you might ended up with no one to respond to a page. 

Clear duties

On my team we have a clear list of things we do in response to a page. Anything else will be left for business hours. 

The things we do are;

1.  Scale up or down the fleet

2. Turn on or off a feature toggle

3. Rollback a deployment 

4*. Rollforward a fix

Note that rolling forward or patching production are the last resort. Making a code change is the slowest way to address an outage and the highest risk. Whenever possible you want to make code changes during normal office hours. 

Good Runbooks

Having good runbooks reduces the cognitive load when dealing with a service outage. They can also save significant amounts of time to fix common problems just by having the steps taken to fix last time recorded. In your regular on-call shift review meeting its best to add new entries to the runbook to cover pages during that week 

How to know your oncall team is in a good place?

  1. If it is easy for people on the team to get someone to cover for them when they go on vacation.
  2. People on the team volunteer to be oncall for peak events 
  3. People don’t complain about being oncall during 1 on 1 reviews